Have a Question?
AWC- Average Weighted Cost Feature
The Average Weighted Cost is a category under the feature “Inventory Cost Strategy”.
The AWC is calculated based on the sum amount of inventory in stock of a certain “material” (physical cost) divided by the total sum paid for all parts under the listed “material”. The same materials can be bought from different providers, at different prices. The AWC collects the Average Weighted Cost across all parts of the same material bought at different pricing.
Navigation Path to Turn On AWC: User Profile drop-down (Top right corner of Doorways)> Configuration> Feature Configuration> Inventory Cost Strategy> Average Weighted Cost.
Adding more of the same Material to Inventory (Receive Action)
Once on the Inventory page the user must select the “Inventory Action” dropdown and select the “Receive” option. Once selected, the user is taken to the “New Inventory Action- Receive” screen.
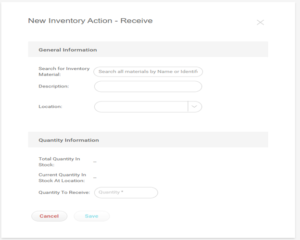
- The user must “Search” for the inventory item they would like to receive more of using the “Inventory Material” search bar.
- The user then selects the desired material. Adds a description of the material being added, adds the location, enters the quantity to be added.
- Once the quantity is added the cost per unit field will appear to the user. The “Effects” section of the screen will prefill once all information is filled in.
- If the user is receiving different quantities of the same material, at different pricing, they can select the “+” button to add another line item at a different cost price.
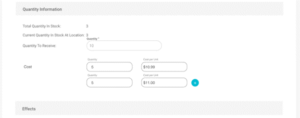
- Once the quantity to be added and the cost per unit are entered the “Action Effects” section will should how the received action will affect the material.

Adding a New Work Order Cost – AWC
- When creating a new work order cost, if Average Weighted Cost is configured, the cost per unit should match the Average Weighted Cost, not the actual cost of the material being used.
- The path to configure AWC is listed at the top of the document.
- We currently are not going to add markup pricing or anything fancy like that, users can just utilize the custom cost field like before.
- Once a material is added to a WO, within the “Cost details” screen the user should be able to see the AWC for the material selected for the WO. This should match the AWC listed on the “Material Details” screen.
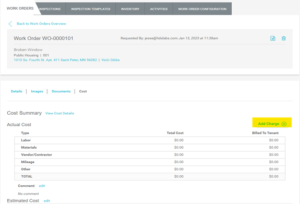
Once a WO is a created the user can add costs (charges) to the WO. Select the WO you wish to add a “Cost” to. Select the “Cost” option to the right of “Documents”. When in the Cost Summary screen select the “Add Charge+” button.
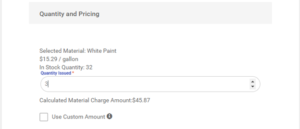
When adding a “Material” charge to the work order, once the user has selected the material they desire, within the “Quantity and Pricing” section, the AWC should be listed as the unit price. After the user enters the quantity amount the total will be summed up based on the AWC not the actual cost of the individual material.
Materials Details Screen
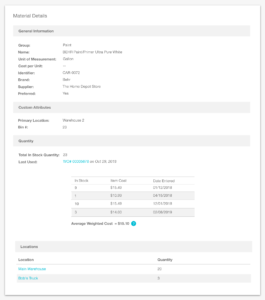
The “Material” details screen provides the user with 4 Sections of information about the “Material” selected. (General Information, Custom Attributes, Quantity, Locations)
The AWC can be found in the “Quantity” section of the “Material Details” screen. In this section the entries from receiving more of the selected material are listed in date order. Each entry line shows the “In Stock” amount added, Item Cost and Date Entered. The AWC is displayed at the bottom of the entry lines. Custom Attributes does not show unless there is a custom attribute for the material item. (If it is not present at first, that is ok)
Deleting Materials from Inventory. (Disposal Action)
The “Dispose” action is meant to remove a certain number of material from a specific Inventory material.
Once on the Inventory page the user must select the “Inventory Action” dropdown and select the “Dispose” option. Once selected, the user is taken to the “New Inventory Action- Dispose” screen.
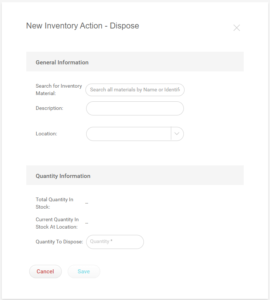
- The user must “Search” for the inventory item they would like to receive more of using the “Inventory Material” search bar.
- The user then selects the desired material. Adds a description of the material being disposed of, adds the location, enters the quantity to be disposed of.
- Once the quantity is entered the “Effects” section of the screen will prefill once all information is filled in.
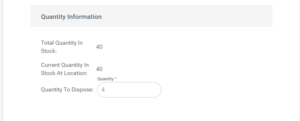
- Once the quantity to be disposed of the “Action Effects” section will should how the disposal action will affect the material.
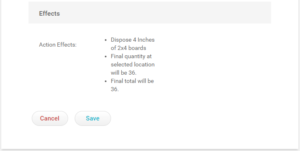
Hit the “Save” button to successfully save the action and dispose the desired material.
